PingerThinger
Introduction and
Documentation
Version
1.3
By Rachel and Jeremy Stanley
copyright 2004
Download Free Version Now
Upgrade to PingerThinger Pro / Enterprise
By Rachel and Jeremy Stanley
copyright 2004
Download Free Version Now
Upgrade to PingerThinger Pro / Enterprise
Introduction
PingerThinger is a network monitoring application for Windows(R) NT/ 2000/ XP. It provides a simple, "one glance", way to tell which IPs are down. It uses ICMP packets (ping) to monitor a list of IP addresses or host names and logs when an address becomes unreachable. (See a screen shot)PingerThinger provides several ways to know the status of a network:
- An icon in the system tray
that displays a green, yellow, or red
computer screen
- A window that dynamically displays which
IPs are currently unreachable or down
- A text file log of when IPs became unreachable and when IPs become reachable again
- A text file log of which IPs are currently unreachable or down(same information as #2)
- If desired, the ability to write the log in #3 to a serial port for monitoring by signboard software
Limitations
The free version of PingerThinger is limited to 10 IP addresses.The Pro and Enterprise versions has no limit on the number IP addresses. The only limitations are based on your machine speed and network bandwidth. PingerThinger Pro is currently being used to ping over 1000 IP addresses every 45 seconds on a WAN/LAN.
Upgrading
to
PingerThinger Pro / Enterprise
PingerThinger Pro and PingerThinger Enterprise have
no artificial limits on the
number of IP addresses. The cost to
upgrade to PingerThinger Pro is
$40
(US). The cost to upgrade to
PingerThinger Enterprise is $450.
Click
here to
find out more.Getting Started Now
Way
#1 - Start Menu
- Download and install PingerThinger
- Edit PingerThinger Parameters (if needed)
- For
Windows 2000 / XP
- Go to Start menu->Programs->PingerThinger->PingerThinger
- Right click on the
PingerThinger shortcut
- Select Properties
- Select the tab that says Shortcut
- Look in the Target field, it will have data like "C:\Program
Files\PingerThinger\PingerThinger.exe" -in in.txt . Add in any
parameters at the end of the field.
- Change the command line parameters
- For Windows NT
- On the toolbar, right click on the Start menu button
- Select Open
- Open Programs -> PingerThinger
- Right click on the PingerThinger shortcut
- See steps 3-6 for Windows 2000 / XP
- Edit the in.txt file by
selecting Start Menu -> Programs
->PingerThinger
->Edit Host List then adding your own IPs
Note: If you change the name of in.txt, you will need to update the -in parameter in the PingerThinger shortcut. - Click on the icon
- A green
computer icon
 should appear
in the system tray.
should appear
in the system tray.
Way
#2 - Batch File
- Download and install PingerThinger
- Edit the batch file,
pingerthinger.bat, located in the
PingerThinger directory (if needed)
- Edit the in.txt file located
in the PingerThinger directory by adding
your own IPs
Note: If you change the name of in.txt, you will need to change the -in parameter in the batch file.
- Invoke the batch file
- A green
computer icon should appear
in the system tray.
Table
of Contents
- Introduction
- Limitations
- Upgrading to PingerThinger Pro / Enterprise
- Getting Started Now
- Table of Contents
- Getting Started
- File Formats
- As PingerThinger Runs
- Exiting PingerThinger
- Uninstalling PingerThinger
- Why Pings Fail
- Using PingerThinger in Team Settings
- Hints on Monitoring LAN / WANs
- Support
Getting Started
The Installer
The installer will install several files in the PingerThinger directory:- a
read me file
(readme.txt)
- a
license file (license.txt)
- the
PingerThinger executable (PingerThinger.exe),
- an
uninstaller (uninst.exe)
- a
sample
batch file (pingerthinger.bat)
- a
sample input file (in.txt)
- a short cut that will run PingerThinger
- an uninstaller
- a link to the PingerThinger website
- the in.txt file
Testing PingerThinger
To test PingerThinger, run start menu ->Programs->PingerThinger->PingerThinger.PingerThinger can also be tested by running the included batch file pingerthinger.bat located in the PingerThinger directory(make sure you are connected to the Internet or your network). The batch file will open a command prompt that needs to stay open, but can be minimized.
If the program is running, a green computer icon should appear in the system tray.
If one of the command line parameters is incorrect, a dialog box will appear with the usage information. Make the correction in the batch file or shortcut and run it again. (See "Command line options" below)
Expected Results Using the Included Batch File
There is 1 IP in the in.txt file, 127.0.0.1 (local host). The icon will start out green and remain green. The properties box should look like this: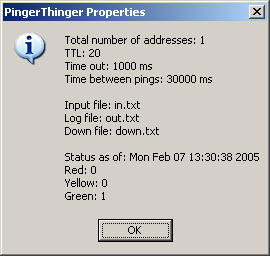
Course of Events if an IP Goes Down and Recovers
This example assumes the IP has been added to the in.txt file and PingerThinger has been started. It also assumes program defaults are being used and the system tray icon is currently green.- PingerThinger's system tray icon is green; the tool tip reads
"PingerThinger
Status Green".
- The IP becomes unreachable.
- PingerThinger sends a ping.
- The ping fails. If no error message is sent by the IP, PingerThinger waits the time specified by the -to option, then considers the ping to have failed.
- The system tray icon turns yellow, and the tool tip reads "PingerThinger Status Yellow".
- PingerThinger waits the time specified in the -pt option.
- PingerThinger sends a ping.
- The ping fails.
- The desktop icon turns red and the tool tip reads "PingerThinger Status Red"
- The IP is added to the "Live Red List".
- The IP is added to down.txt.
- The failure is logged to out.txt.
- .... PingerThinger continues pinging the IP.
- The IP recovers.
- PingerThinger sends a ping.
- The ping succeeds.
- If this IP was the only one down, the system tray icon turns
green; the tool tip reads "PingerThinger Status Green". If there
are other IPs down, the icon remains red.
- The IP is removed from the "Live Red List".
- The recovery is logged to out.txt.
Adding New IPs
To add a new IP, simply open the input file (in.txt) in a text editor or spreadsheet program and add a line. Then restart PingerThinger. (See "Input File Format" below).If you are launching PingerThinger from the Start menu and want to change the input file, you will need to edit the shortcut. See Getting Started - Way 1.
You can also see the input file from "Show Input File" option inside PingerThinger..
Command Line Options
It is easy to configure PingerThinger from the command line or batch file. The only parameter required is the name of the file containing the IP addresses. To change options, edit the batch file or short cut. Options can be added in any order.Example:
Edited
Command Line
Original
Command Line:
PingerThinger.exe -in.txtEdited Command Line: PingerThinger.exe -in in.txt -out log.txt -pt 10000 -sp COM1 -spp "baud=115200"
What this does:
- names the log log.txt
- changes the time between pings to 10 seconds
- sets PingerThinger to log to COM1
- sets the baud rate for COM1
to 115200
Options
options in red are required.-in <input file> [-out <output file> -red <down IP file> -pt <target time in seconds between pings> -ttl <time to live> -to <time out> -size <size of ping packet (incl header)> -sp <com port for logging> -spp <com port settings> -archive <size in KB to archive log>]
| Option |
What
it Does |
Default |
Min
Value |
Max
Value |
| -in |
The
name of the input
file. This file contains all the machine names and their IPs |
-- |
-- |
-- |
| -out |
The
name of the log. This
file is a log of when an IP changes from reachable to unreachable and
vice
versa. |
out.txt |
-- |
-- |
| -red |
The
name of the log file
containing
currently unreachable or down machines. |
down.txt |
-- |
-- |
| -pt |
Ping
Time. The minimum
time in milliseconds between pings (i.e. ping this machine every x
number of milliseconds) |
30000 ms | 5000 ms | -- |
| -ttl |
Time
to Live. The number
of hops allowed. |
20
hops |
1
hop |
255
hops |
| -to |
Time
Out in milliseconds.
The amount of time allowed to pass before an address is considered
unreachable. (i.e. if the ping doesn't get a response in a
certain
amount of time, the ping is considered to have failed) |
1000
ms |
-- |
-- |
| -size |
Size
of ping packet (incl
header). The default is the same size as the ping sent by
Microsoft's ping command |
44
bytes |
-- |
-- |
| -sp |
The
serial port to write the log
to (COM1, COM2) |
-- |
-- |
-- |
| -spp |
The
parameters for the serial
port (only used if -sp is specified) |
baud=9600
parity=N data=8 stop=1
octs=on |
||
| -archive |
The size in kilobytes to archive
the log specified in -out |
-- |
1 KB |
Using the Serial Port
To write information to a serial port (COM1, COM2) you use the -sp option and specify the port. The default parameters are baud=9600 parity=N data=8 stop=1 octs=on.If you wish to change the serial port parameters (or if you are using Windows NT), use the -spp option. The syntax is the same as for the mode command. The format for the parameters is described here on Microsoft's website under the information for lpdef. To see specifically which format to use, look at the documentation for the mode command for your operating system. On Windows 2000/XP machines the format can be -spp "baud=9600 parity=N data=8 stop=1 octs=on". On Windows NT use -spp "9600,n,8,1" .
File Formats
Input File Format (in.txt)
The input file is the list IPs for PingerThinger to monitor.<machine name>\t<IP address>\t<comment>\r\n
the \t denote a tab and \r\n denotes an end of line. Each IP should be on its own line. Do not use any white space in the machine name or IP address.
If you put a # in front of a line, that line will be ignored as a comment.
The <comment> area can be left blank or used to hold information. For example, some users put who to contact if the machine is down or where the machine is located.
Instead of an IP address, a host name may be used. The host name needs to be fully qualified. For example, do NOT use something like www.someurl.com, use something like themachine.someurl.com. Using a host name will slow down the pinging because the name will be resolved for every ping and every ping reply. Also, if there is one line in the input file that has a host name and a second line that has the IP address for that host name, the line with the host name will always time out.
Every IP is expected to be unique. If a duplicate IP is found, a dialog box will show the line where the duplicate is. The PingerThinger will still run, but the second IP will not be pinged.
Example: in.txt
# Some lines that might appear in the input file# note that spaces are allowed in the comment, but not in the name or IP address
R-HQCorp 10.80.1.1 HQ core router
S-HQCorp 10.80.1.2 HQ core switch
Log File Format (out.txt)
The log file is a history of when IPs became unreachable and when IPs become reachable again.<date>\t<status>\t<name>\t<IP>\t<comment>\t[<error message>\t<time down>]
\t denotes a tab
<date> The date and time when the IP became unreachable or reachable again
<status> the status of the IP (RED)
<name> the name associated with the IP address
<IP> the IP address
<comment> The comment associated with the IP address
<error message> The error message associated with the ping
<time down> If the IP has switched from RED to GREEN the time in milliseconds the IP was unreachable
If the status is RED, PingerThinger writes out the error message.
If the status is now GREEN, PingerThinger will log the time down. This is the difference in time between when the machine was first detected as being down and when it was detected as being reachable.
Down File Format (down.txt)
The down file is a list of all the IPs with a status of RED. It is updated after every iteration through the list of IPs to be pinged.<date>\t<status>\t<name>\t<IP>\t<comment>\t<error message>
(See above for explanation)
Understanding the Status Codes
PingerThinger uses three status codes: GREEN, YELLOW, and RED.GREEN - the IP responded to the most recent ping
YELLOW - the IP has not responded to the most recent ping either because of an error message or because of a time out
RED - the IP has not responded to at least the two most recent pings, either because of an error message or because of a time out.
An IP's status changes to YELLOW after the first ping fails. It changes to RED after the second ping in a row fails.
As PingerThinger Runs
Logs
PingerThinger keeps 2 logs. The first is a log of when a machine became unreachable and when a machine that was down became reachable, by default called out.txt. The second log is a log of machines that are currently unreachable, by default called down.txt.Archiving
Archiving prevents your log file (out.txt) from becoming too large. When the log reaches the size specified, it will be renamed with the date and time. PingerThinger will then continue logging to the original file name. If for any reason PingerThinger cannot rename the log file, it will log to the file until the file can be renamed.For example, if your log was out.txt, the archive file will be out.YY-MM-DD.HH-MM-SS.txt.
The System Tray Icon
The system tray icon provides a "one glance" status of the network. All IPs must be GREEN for the icon to be greenOn startup, the icon is green. When shutting down, the icon turns to black
Menu Options
Right click on the icon to see the menu options.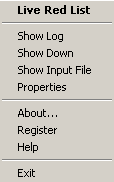
Live Red List -- displays a window listing all the IPs with the status RED. Updated dynamically.
Show log -- displays the history in notepad (or whatever the default text viewer is)
Show down -- displays the log of down IPs in notepad (or whatever the default text viewer is)
Show Input File -- dislpays the input file of IPs (in.txt) that PingerThinger is currently using. Note: Changes in this file will not be reflected until PingerThinger is restarted.
Properties -- displays meta information about this session of PingerThinger: Total number of Addresses, TTL, Time out, Time between pings, input file, log file, down file, status, the number of red, yellow and green IPs.
Note: the information displayed in properties is not updated dynamically. To see updated information, select the option from the menu again.
About... -- the date this version of PingerThinger was built, also a link to www.pingerthinger.com
Register -- enter the product key to register your copy of PingerThinger. (This option will not appear on copies of PingerThinger Enterprise that have already been registered.)
Help -- displays the on-line documentation for PingerThinger
Exit -- exits the program. PingerThinger may take a moment to exit completely because logs need to be finished being written.
Live Red List
The Live Red List is a list of the IPs that are currently unreachable. It is updated immediately and provides an easy way to see which IPs need attention.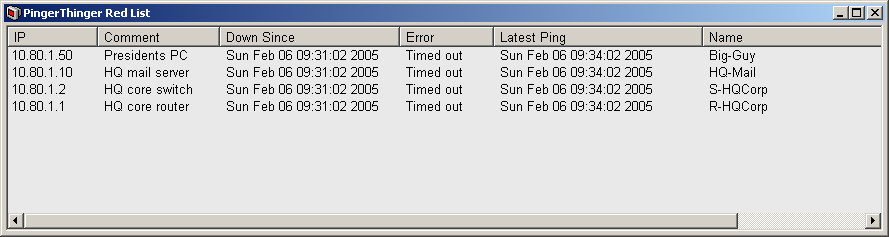
The Live Red List's font can be modified by clicking on the icon in the top left corner. Select "Choose font"; then select the font.
Startup Lag Time
PingerThinger has a known lag time between startup and when the IPs' status is displayed accurately. This startup time is approximately equal to 2 * (ping time + time out) + 30 s (fudge factor)Exiting PingerThinger
To exit PingerThinger, right click on the icon and select exit. It may take a few minutes to shut down since it needs to finish writing out log files. When shutting down, the icon turns to blackUninstalling PingerThinger
To uninstall PingerThinger, go to Start menu->All Programs->PingerThinger->PingerThinger->Uninstall . This will remove registry keys, PingerThinger.exe, in.txt, down.txt, pingerthinger.bat, readme.txt, license.txt, and various shortcuts.Why Pings Fail
Timeout Errors
A time out error occurs when a ping has been sent and it has been longer than the time specified in the -to option.Firewall is blocking pings
Many firewalls and routers block pings to prevent malicious people from figuring out network topology. Talk to your network administrator if this is an issue.
The latency of the network is greater than the time out
If the time to traverse the network is greater than the time specified in the -to option, the IP will time out. Increase the time in the -to option. This error can highlight which areas of the network are slow. If the latency problem goes away, the ping should be once again able to reach the IP.
TTL Expired
The IP is further away than the ttl allowsThe TTL on the packet has expired. Increase the number of hops specified on the -ttl option. To see how far away a machine is, try running Microsoft's ping on the command line. It should give you an idea of how far away the IP is.
There is a loop in the network
This is rare, but if there is a loop in the network, then certain IPs can become unreachable. Increasing the -ttl option will not help in this case.
Using PingerThinger in Team Settings
Often a team of people have the responsibility of ensuring network stability. PingerThinger has been used in these settings by either projecting the "Live Red List" onto a screen at the front of the room or by configuring other software to take the log written to the serial port and recreate it on team members' desktops.Hints on Monitoring LAN / WANs
Suppose you have a network with the following configuration: the local router has a loopback interface, 2 ethernet interfaces, and 2 serial interfaces. Outboard each ethernet interface is a ethernet switch. Outboard each serial interface is a T1 circuit which has a router at the far end with one serial interface and one ethernet interface. Outboard the remote ethernet interface is one ethernet switch. Each interface or switch has its own IP address configured.If you pinged every IP in this network, you would have to ping at least 13 IP addresses.
To reduce the number, ping:
The local routers loopback interface
The two local ethernet switches
The remote routers serial interface IPs
The remote ethernet switches
Using this method you only have to ping 7 IP addresses. A device being up implies that the path to it is also up. For instance, if the local ethernet switch is up this implies that the local routers' ethernet interface to that switch are also up.